MISC. ORNAMENTS USING VINTAGE GLASS BALLS:

For
my tree ornaments I made a variety of styles using vintage glass balls
as the base. I found a bag of 63 balls for $2.50 at a flea market and
decided to repuropse some of them. The first step to using them was to
remove the chipped cracked paint so that anything I glued to them would
stick and give way with the loose paint.
To
remove the color from old Christmas balls, place them in the sink and
run cold water over them. The paint will loosen and slide right off. I
only did this with those garish royal blue ones, I just don't like them
so they got used in these projects. The paint comes off and you are
left with a shiny silver mercury looking ball, great to use as is. Allow
to air dry completely before embellishing.
LEATHER LOOK ORNAMENT:

You will need:
*Masking Tape
*Paper Towel
*Brown Shoe Polish
*Embellishments of your choice
Getting started:
*Tear
off pieces of masking tape and begin taping the ornament with the
jagged edges covering any straight edges. Tape the whole ball and
burnish the tape down.
*Using paper towel, rub brown shoe polish all over ball.
*Glue on ornament cap and embellish as desired.
CHENILLE ORNAMENT:

You will need:
*Chenille Yarn
*Hot glue & glue gun
Getting Started:
*Start at the top of the ornament by adding a bit of hot glue to secure the yarn end.
*Continue adding glue and wrapping yarn until whole ball is covered.
*Glue on ornament cap.
*Embellish as desired.
HAMMERED FINISH ORNAMENT:

You will need:
*Hammered Finish Spray Paint ~ I used RUST~OLEUM Copper Hammered
*Clothes hanger
*Twine
Getting Started:
*Tie no more than three ornaments to a clothes hanger with twine.
*Following paint can directions, spray ornaments.
NOTE:
These ornaments will drip a bit, do this outside in a well ventilated
area. I hung mine in a tree and dabbed the drip on the bottom with a
paper towel to remove excess. Allow to dry completely.
*Clip twine and remove ornament from hanger.
*Glue on ornament cap.
*Embellish as desired.
GLITTERED TATTERED ROSE ORNAMENT:
You will need:
*Cream colored spray paint
*Clothes Hanger
*Twine
*Clear Drying Glue ~ I used Matte Gel Medium
*Glitter
*Paint brush
Getting started:
*Tie
no more than three balls to a clothes hanger with twine. Spray paint
them with the cream paint in a well ventilated area. This might drip
too so you might want to do these outside also. Allow to dry
completely.
*Glue on ornament cap.
*Dab
gel medium on one half of the ornament kind of thick and glitter.
Allow to dry and then repeat for the other half of the ornament.
*Embellish as desired.
NOTE: To fashion a tattered muslin rose, follow the directions for making a ribbon rose HERE,
only use a torn strip of muslin. I rubbed brown ink over the tattered
edges to antique the rose. For the leaves on this one I used some silk
wedding floral leaves. I inked them all over in brown ink then brushed
on gel medium and glittered with mica flakes.
GLITTERED ORNAMENT:
 You will need:
*Matte Gel Medium
*Paint Brush
*Glitter
Getting Started:
*Dab
gel medium on one half of the ornament kind of thick and glitter.
Allow to dry and then repeat for the other half of the ornament.
*Glue on ornament cap.
*Embellish as desired.
VINTAGE PAPER COLLAGE ORNAMENT:

You will need:
*Vintage paper scraps
*Matte Gel Medium
*Paint Brush
*Tissue Paper
Getting Started:
*To
make working with the ball easier I glued on the ornament cap first and
allowed to dry. Then I inserted a wooded skewer into the ornament
opening and taped it securely, inserting the skewer into a block of foam
to hold it while I worked.

 *Tear small pieces of tissue paper.


 *Tear small pieces of tissue paper.
 *Spread
glue over section of ornament and place tissue paper over it, lightly
brushing more glue onto it to stick it down. Repeat process until whole
ball is covered. Allow to dry.
*Spread
glue over section of ornament and place tissue paper over it, lightly
brushing more glue onto it to stick it down. Repeat process until whole
ball is covered. Allow to dry.

 NOTE:
You are building a base with this step so that your vintage papers
will stick, otherwise they will slide all over the place and not stick
well.
NOTE:
You are building a base with this step so that your vintage papers
will stick, otherwise they will slide all over the place and not stick
well. *Once
ornament is dry, repeat gluing process only this time apply your
vintage papers in a random fashion until whole ball is covered. Allow
to dry.
*Once
ornament is dry, repeat gluing process only this time apply your
vintage papers in a random fashion until whole ball is covered. Allow
to dry.


*Embellish if desired.
MUSLIN STAMPED RIBBONS:
 I hung all these ornaments with hand stamped torn muslin ribbons. To make your own ribbons you will need:
*Muslin
*Scissor
*Ink Pad
*Rubber stamps of your choice
*Old press cloth
*Hot dry iron ~ cotton setting
Getting Started:
*Determine the length you want your ribbons to be and cut your muslin to that length.
*Make a small snip near both of the outside edges with a scissor and rip the muslin leaving a raw edge.
*Begin by inking your stamp and stamping a row of your chosen image down the length of the muslin.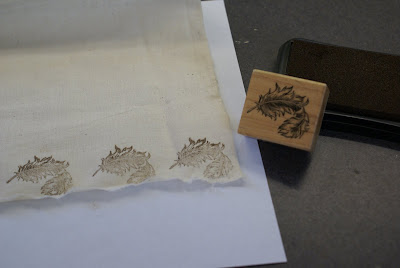 *Leave a small gap and repeat stamping process until you have as many rows stamped as you need for ribbons. Allow ink to dry.
 *Cover stamped images with an old press cloth and iron to heat set the ink with a dry iron on a cotton setting.
 *Leave a small gap and repeat stamping process until you have as many rows stamped as you need for ribbons. Allow ink to dry.
 *Cover stamped images with an old press cloth and iron to heat set the ink with a dry iron on a cotton setting.
*Snip between each ribbon row with a scissor and then rip the fabric to create your ribbon.

 *Remove any excess threads
*Place ribbon strips face down on press cloth and press out rolled edges. Use your custom stamped ribbons on ornaments, to tie up packages, or to add to your artwork.
 Use your custom stamped ribbons on ornaments, to tie up packages, or to add to your artwork.
Please feel free to copy or print this tutorial for your use.
Enjoy!
Blessings,
Sandy
No comments:
Post a Comment